Xilink Vivado » History » Revision 39
« Previous |
Revision 39/99
(diff)
| Next »
Frédéric Blanc, 2023-05-23 09:49
Xilink Vivado
installation Ubuntu 20.04
sur le site de xilinx telecharger:
https://www.xilinx.com/support/download.html
Xilinx Unified Installer 2020.1: Linux Self Extracting Web Installer
en root
setenv XILINXD_LICENSE_FILE 2100@flexalter.laas.fr
chmod +x Xilinx_Unified_2020.1_0602_1208_Lin64.bin
sudo ./Xilinx_Unified_2020.1_0602_1208_Lin64.bin
https://danielmangum.com/posts/vivado-2020-x-ubuntu-20-04/
installation Windows
Vivado 2022.2
Windows 64-bit: Run the settings64.bat from the Vivado/<version> directory
On Windows, click Start > All Programs > Xilinx Design Tools > Vivado 2022.2 > Vivado 2022.2 Tcl Shell to launch the Vivado Design Suite Tcl shell.
dir D:\Public\RedPitaya-FPGA
vivado -source red_pitaya_vivado_project_Z10.tcl -tclargs v0.94
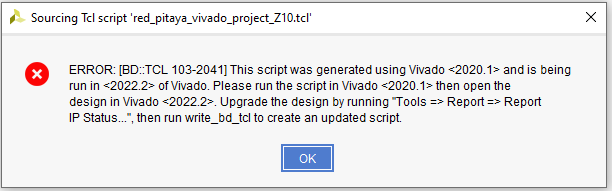
We recommend Vivado 2020.1
Vivado 2020.1
Création d'un nouveau projet
soource: https://github.com/lvillasen/RedPitaya-Hello-World
Clone the repositiry
Create a new project with Vivado.
Select the device xc7z010clg400-1
Add the constraint redpitaya.xdc and verilog counter.v files from the repository.
Create a new Block Design according to the following instructions to creat a block diagram similar to Fig. 1.Binary_Counter.
Add the IP called ZYNQ7 Processing System from the menu and Run Block Automation with default options.
Add Module counter.v from the menu.
clic doit 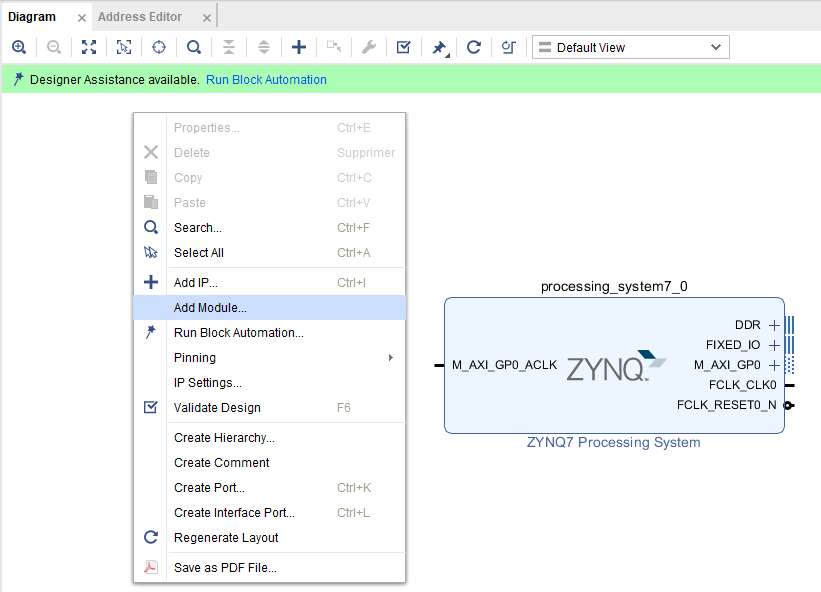
Add a Binary Counter from thr Add IP menu.
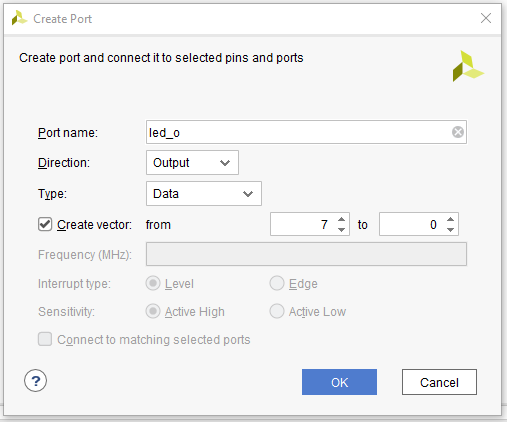
Add a port called led_o with components from 7 down to 0.
connect

From the menu click on Validate Design
In 'Sources' go to 'IP Sources' right-click on 'project1' and select 'Create HDL Wraper'

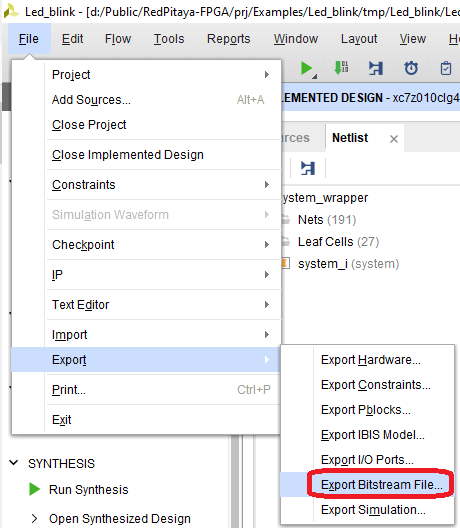
Proceed to run Synthesis, Implementation and Bitstream Generation
Find the bitstream file (you may use the command 'find . -name *bit')
Transfer the bitstream file (*.bit) to the Red Pitaya (you may use *sftp root@rp-ip and put *.bit)
clic doit
Tcl Console
cd d:/Public/RedPitaya-FPGA/prj/Examples/Led_blink
source D:/Public/RedPitaya-FPGA/prj/Examples/Led_blink/make_project.tcl

pour éviter cette erreur copier le dossier core dans ../tmp/
Bitstream
le fichier bitstream doit être remplacer le fichier /dev/xdevcfg
tuto Web
https://github.com/lvillasen/RedPitaya-Hello-World
https://redpitaya.readthedocs.io/en/latest/developerGuide/software/build/fpga/fpga.html
https://antonpotocnik.com/?p=487360
https://easytp.cnam.fr/alexandre/index_fichiers/support/zynq_cours_tp_vivado_zc702.pdf
http://jmfriedt.free.fr/redpitaya.pdf
http://staff.ltam.lu/feljc/electronics/redpitaya/RedPitayaScriptingSummary_1.pdf
Updated by Frédéric Blanc almost 2 years ago · 99 revisions